Last Updated on December 30, 2025 by Leslie
If you’re here, you probably typed something like how to blur an image, or even the chaotic classic blur a image… because you need a blur right now. Not a 40-minute photography lecture. Not a “start a free trial” surprise.
Maybe you want to blur the image background so your subject pops. Maybe you need to blur a distracting sign. Maybe you want a quick blur effect on pictures so the focus stays on the important part. Whatever the reason, the trick is simple:
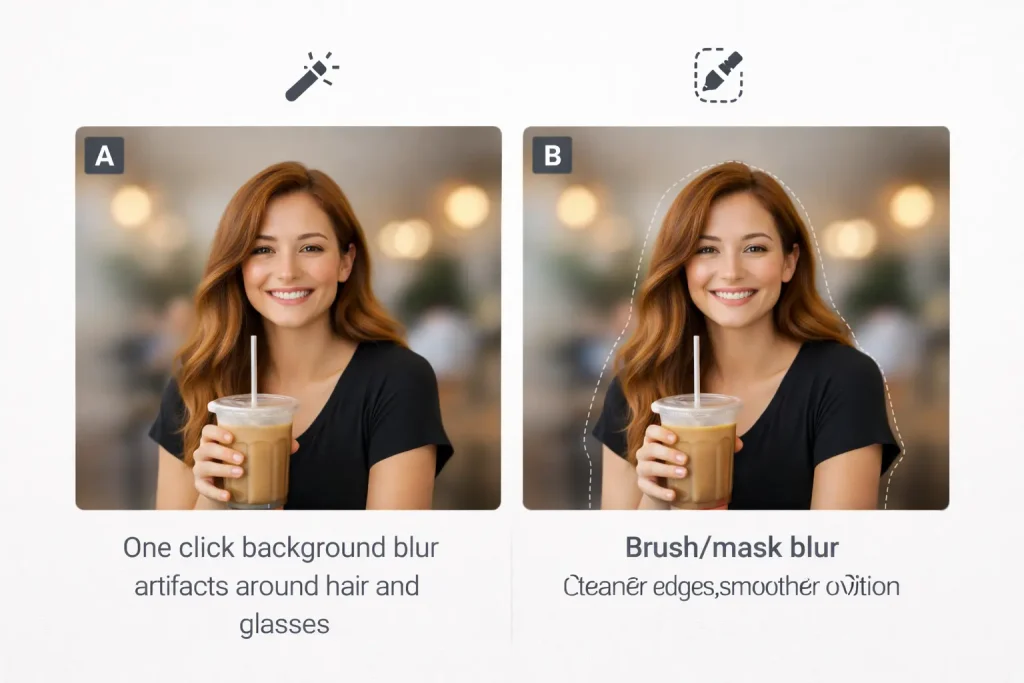
Choose the right blur type, then choose the right level of control. One-click blur is fast, but brush/mask blur usually looks better.
Let’s make it easy.
Why People Search How to Blur an Image
Most blur requests fall into four real-life buckets:
- Make it look more professional: blur background in photos so the subject stands out.
- Hide distractions: blur a messy corner, a logo, a random stranger, a street sign.
- Create a vibe: dreamy softness, bokeh, motion blur for speed.
- Censor sensitive details: blur faces, license plates, ID numbers.
The pain points are also pretty universal: paywalls, “auto blur” that looks unnatural, and privacy worries when uploading photos online.
How to Blur a Image Online Free in the Fastest Way
If your goal is speed, you want a tool that does two things well:
- One-click background blur with a strength slider
- No weird halos around hair, glasses, or hands
Here’s the quickest workflow that works in almost any blur photo editor:
Step 1: Upload your picture
Step 2: Choose “Background blur” or “Portrait blur”
Step 3: Adjust intensity slowly
Step 4: Check edges at 100% zoom
Step 5: Export as PNG or high-quality JPG
That’s it. The biggest beginner mistake is blasting blur strength to 100 and wondering why the image looks like a cutout sticker.
Blur the Image with a Brush: How to Blur Part of a Picture
When one-click blur looks fake, go manual.
A blur brush tool is designed to soften specific areas or obscure details, and it’s also commonly used to blur around a subject to pull attention toward the center.
Use brush blur when:
- You only need to hide one object
- The background is complex
- Auto blur makes strange edges
A simple technique that looks surprisingly “pro”:
- Brush blur in multiple light passes instead of one heavy pass
- Use a bigger brush than you think, with softer edges
- Feather the boundary so it blends
This is why people say “manual selection looks better but takes longer.” True. But you don’t need to be an expert—just don’t rush the edges.
Add Blur to a Photo for a Natural Blur Effect on Photos
A “nice” blur usually has two qualities:
- It’s smooth, not chunky
- The subject edge stays clean, not outlined
If you want a natural blur effect on photos, follow this rule:
Blur should increase as you move away from the subject.
Real cameras don’t blur everything equally. If the blur strength is uniform across the whole background, your brain notices it.
A quick way to fake realism:
- Keep blur lighter near the subject
- Stronger blur farther away
- Add a subtle vignette if the scene feels flat
This is also where “bokeh/lens blur” can look nicer than basic blur—because it mimics camera-style depth.
Add Blur to Image for a Strong Blur Effect on Pictures
Sometimes you don’t want “pretty blur.” You want “no one can read this.”
That’s where pixelate/mosaic wins. A smooth blur can still leave information readable, especially on text.
Use these blur types based on your goal:
- Gaussian blur: the classic soft blur; good for background softening and reducing detail
- Lens blur or bokeh: more “camera-like” background blur
- Motion blur: creates a speed streak effect; also useful to hide moving details
- Pixelate or mosaic: best for censoring faces, plates, sensitive text
You don’t need to memorize names. Just match the blur to the job: soften vs hide.
Choose the Right Blur: Gaussian Blur vs Pixelate vs Motion
Here’s a simple chooser that keeps you out of trouble:
- Pick Gaussian blur when you want smooth softness and natural transitions.
- Pick Pixelate/Mosaic when you must block information, not just “make it less clear.”
- Pick Motion blur when you want movement energy, or you’re hiding something that’s already streaking.
The keyword you’ll see most often in editors is gaussian blur, because it’s the default “looks okay for most things” option.
Quick vs Precise: One-Click Blur or Mask Blur
This is the real decision that changes your result:
Use one-click blur when
- It’s a casual post
- The background is simple
- You don’t care about perfect hair edges
Use mask or brush blur when
- Edges matter
- The background has patterns
- You want it to look natural up close
If you’re trying to blur background in photos for business (product shots, profile photos, marketing graphics), brush/mask blur is usually worth the extra minute.
Online vs Local: Privacy and Paywalls Without the Drama
Two quick realities:
Online blur tools are convenient, but some people worry about uploading personal images. That concern is valid—so your safest approach is either:
- use a tool that clearly states it doesn’t store images, or
- use a local editor on your device
Paywalls are common, especially for HD export and watermark-free downloads. The best way to avoid wasting time is to test export early:
- upload one image
- blur it
- try to download
If it blocks you at the end, you just saved yourself an hour.
When GStory Fits Naturally in This Blur Workflow
GStory isn’t a “blur tool” in the classic sense—but it fits into blur workflows in two common, practical moments:
You blurred for style, but the photo is still low quality
If your original image is noisy or soft, blur can make it feel even more “muddy.” In that case, enhancing clarity first can help.
GStory’s AI Photo Enhancer is positioned for improving resolution and sharpening blurry photos; it supports common formats (PNG/JPG/JPEG/WEBP) and up to 10MB uploads, and it describes upscaling and “blur to clear” improvement on the tool page. Use it to clean the image first, then add your blur effect.
You want a clean subject, then blur the background in a different editor
A very reliable “looks pro” trick is: separate the subject cleanly, then blur the background layer.
GStory’s Photo Background Remover is built for cutting out the subject and replacing backgrounds; it supports the same common formats and upload limits on the page.
That’s two links, two real use cases, and no “forced” tool spam.
FAQ
What blur tools are easiest to use?
The easiest tools are the ones with:
- one-click background blur
- a strength slider
- a brush for touch-ups
If a tool doesn’t let you refine edges, it’s usually faster… and worse.
Which filter is commonly used for blurring an image?
Gaussian blur is the most common “default blur” filter in editors because it creates a smooth, natural-looking softness.
How do I censor an image?
General rule: pick a blur type that truly blocks information. Pixelate/mosaic is often stronger than smooth blur for censoring. Keep it simple: cover the area fully, check readability at 100% zoom, then export.
Final Thoughts: How to Blur an Image Without Regrets
To blur the image well, you don’t need fancy software. You need the right choice:
- Fast: one-click background blur
- Clean: brush/mask blur for edges
- Strong: pixelate/mosaic for censoring
- Stylish: gaussian blur for softness, bokeh for camera-like depth
And if your photo is already soft, enhance clarity first, then apply your blur effect—your final result will look much more intentional.
Leave a Reply