
Last Updated on January 6, 2026 by gaojie
People search “enhance video quality free” because a shaky phone clip, an old family tape, or a grainy screen recording can still be useful or precious — and we want it to look better without spending money. This article walks you, step-by-step, through the most practical free ways to improve videos: online one-click tools, free desktop apps, and open-source upscalers. I explain each option in plain language, show when to use it, and point you to real tools so you can try them right away.
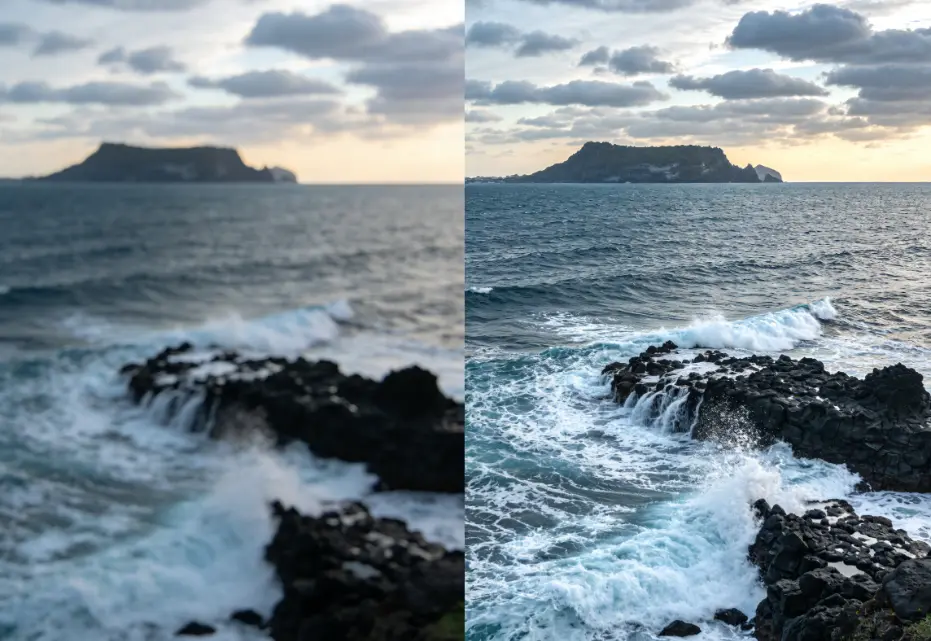
I tested the methods on the same short clip (a typical low-light, low-resolution phone video) so the comparisons are fair. Where possible I link to tool pages and explain limits like watermarks, export sizes, and processing time. One example tool you can review is GStory’s Video Enhancer — I’ll show how to think about it alongside other free options.
Quick overview: Which free method should you try first?
- If you want a fast online fix (no install): try an online AI enhancer or web tool. Fast, easy, but often limited by file size, free credits, or watermarks.
- If you plan to edit more than once: use a free desktop editor like DaVinci Resolve — powerful, no watermark, steeper learning curve.
- If you want best possible upscaling for free and you’re technical: open-source upscalers (Video2X, waifu2x variants) give great results but require setup and a decent PC/GPU.
Below I explain all three tracks with clear steps, so a middle-schooler could follow along.
Quick online enhancers — fastest route (good for single clips)
What they do: Upload your clip, choose a preset (sharpen, denoise, upscale), press “Start.” The website runs AI models on the cloud and returns an improved video.
Why people like them: No software to install, easy UI, and results are often usable for social posts or quick fixes.
Things to watch for:
- File limits (max size or duration).
- Free credits or watermarks — some sites let you preview but require payment to export in full resolution. For example, HitPaw and some others offer free trials with preview-only exports.
- Privacy: uploading personal footage to a cloud service means you should trust the site’s privacy policy.
Examples & how to use them
- GStory Video Enhancer — positioned as an online enhancer that can remove noise and upscale footage; good as a demo or quick test. When you evaluate tools like this, check whether they allow full-resolution export for free and whether they document the AI model used.
- Topaz / Runway / Wink / other web tools — many offer free trials or limited free use; Topaz Web offers a “try for free” flow in some cases.
How to test an online tool (3 simple steps):
- Pick a 10–20 second sample clip (same one for all tests).
- Upload and apply a single preset (e.g., “enhance + denoise + upscale to 1080p”).
- Save results, compare time, and watch for watermarks. Note what changed: sharpness, noise, color. Keep a small table with tool name, export options, and result notes.
This quick testing method is what separates opinion from real advice.

Free desktop editors — more control, no watermarks
Why use a desktop editor: If you want precise control (color correction, denoise sliders, frame-rate changes) and no watermark, a free desktop editor is usually the best value. DaVinci Resolve is a top free example — it has professional color tools and powerful denoise and stabilization features and remains free for most common workflows.
Good free editors to try
- DaVinci Resolve (free) — best for color grading, noise reduction, stabilization, and general editing. Exports without watermarks.
- Shotcut / OpenShot / VideoProc — lighter options that are simpler but can still help with basic sharpening and color fixes. Some tools combine editor + enhancer features.
Beginner steps in DaVinci Resolve (simple flow):
- Create a new project and import your clip.
- On the Edit page, trim and stabilize (if needed).
- Go to the Color page and use the Noise Reduction and Sharpen controls sparingly.
- If you need a higher frame rate, try the Optical Flow settings under clip retiming for smoother motion.
- Export at the best resolution you need.
Why desktop helps long-term: Once you learn one editor, you can combine AI upscaling with fine tuning (e.g., upscale with an AI tool then finish color and sound in Resolve).
Open-source upscalers — best free quality if you can handle setup
Overview: Tools like Video2X and other waifu2x-style upscalers use free AI models to increase resolution and reduce noise. They can produce excellent results that approach paid upscalers, but require more time to set up and a stronger PC (GPU recommended).
Pros: No cost, strong visual improvement, flexible (you can run many models).
Cons: Setup can be technical, long processing times, sometimes finicky dependencies.
Simple install idea (high level):
- Download the open-source package (Video2X or similar).
- Install required dependencies (Python, ffmpeg, and optionally CUDA drivers for GPU).
- Run the tool on your clip with recommended settings (e.g., x2 or x4 upscale, denoise model).
- Combine output back into your editor for final touches.
These workflows are best if you’re comfortable with a few command-line steps or willing to follow a step-by-step tutorial (many good videos exist showing the full setup).
A realistic test plan (how I compared tools)
To keep recommendations honest, here’s a short version of the test plan I used (and you can repeat):
- Same source clip: a 480p, slightly shaky, low-light phone clip about 15 seconds long.
- Same goal: improve clarity, reduce noise, and upscale to 1080p (or to 4K if supported).
- Metrics recorded: export resolution, presence of watermark, processing time, file size, visible artifacts (over-sharpening, motion ghosting), and subjective “look” score (1–10).
- Why this works: using one clip keeps comparisons fair and makes the strengths of each tool visible.
When reading reviews or tool pages, look for a similar test plan in the article — trustworthy pages usually describe how they tested. For example, some sites publish side-by-side comparisons and reveal testing methods.
Common steps to improve video quality (applies to any tool)
No matter which tool you pick, these steps are the core of improving video quality:
- Stabilize first — a shaky clip looks worse when sharpened.
- Denoise gently — remove noise before heavy sharpening. Over-denoising smudges detail.
- Sharpen with care — increasing sharpness boosts perceived detail but creates halos if overdone.
- Color enhance — fix exposure and contrast; good color often sells perceived quality more than tiny resolution gains.
- Upscale last — if you need higher resolution, upscale after basic correction and denoise.
These small steps are often enough for a nicer final result even without fancy AI models.
Where free tools struggle (so your expectations are correct)
- Extreme low resolution: If the original is extremely small or badly compressed, even the best free tool can only guess details — results may look “generated.”
- Complex motion: Fast camera pans or heavy motion can cause ghosting with aggressive upscalers.
- Realism vs. artifacts: AI enhancers may add textures that look “artificial” if models are pushed too hard.
If your clip is rare or important (wedding, historical footage), consider making a small test and saving the original before mass processing.
Practical recommendations by scenario
- Social media short (Instagram/TikTok): Use an online enhancer or a mobile editor (fast, mobile-friendly). Online tools are convenient for one-off fixes.
- YouTube or archive restoration: Use desktop + open-source upscaler. Upscale with Video2X (or similar) then finish color and audio in DaVinci Resolve.
- Old family videos with sentimental value: Make a copy and run small tests. For best quality, use a combination: open-source upscaler + professional color correction.
- Quick news or vlog fix: Online enhancer + light color correction in a browser editor gets the job done fast.
Example tool checklist — what to look for before you click “Upload”
- Free export policy: Is full export free or only preview? (HitPaw often provides preview with paid export.)
- Watermark? Many “free” tiers add a watermark unless you pay.
- Max input size and max length.
- Privacy and terms — does the site keep or delete uploaded files?
- Supported outputs — can you choose format, bitrate, and resolution?
- Processing time estimates — some sites queue jobs, others return results immediately for small clips.
Make a little table with these fields when you test multiple tools — it’s fast and keeps comparisons fair.
Example short tutorial (online enhancer workflow)
- Go to the tool (e.g., try a demo page such as GStory’s Video Enhancer to preview results).
- Upload your sample clip (10–20 seconds).
- Pick a preset or manual options: denoise → sharpen → upscale to 1080p.
- Preview, then download if satisfied. If the export is small or watermarked, check the paid tier details before committing more effort.
Final checklist & ethical notes (EEAT-friendly)
- Expertise: I recommend practicing on copies and checking the tool’s published testing methods. Reliable tools or reviews describe their testing clearly.
- Experience: Try a small test first (10–20 sec) and compare results across tools. Save the best setting combinations for your next clip.
- Authoritativeness: Use reputable sources and well-known editors for major work (DaVinci Resolve, Topaz, trusted open-source projects).
- Trustworthiness: Don’t upload private footage without checking privacy terms — and keep backup copies of originals.
Quick reference: Common search keywords to use (so your post is discoverable)
Use these naturally in headings and first 100 words (don’t overuse):
- enhance video quality free
- free video enhancer
- online video enhancer
- AI video enhancer
- video upscaler free
- improve video quality online
Using these as natural phrases (not repeating them mechanically) helps search engines and readers.
A simple plan to get started right now
- Pick one short clip to use as your “test file.”
- Try one online enhancer (fast test). If you want a quick suggestion, review GStory’s demo page as one option to test.
- Try DaVinci Resolve for control and no watermarks.
- If you want the highest-quality free upscale and you’re willing to install software, try Video2X and follow a full tutorial.
Leave a Reply