
Last Updated on January 7, 2026 by gaojie
If you just want to cut the start or end, use the built-in Photos app — open the video, tap Edit, drag the handles, then Done → Save Video or Save Video as New Clip. For removing middle sections or combining clips, use iMovie or a third-party app (CapCut/InShot). If you need a short demo clip from a longer video (for your article or social post), an AI clip generator can speed things up.
Why this guide — and who it’s for
People searching “how to shorten iPhone video” usually want a fast fix. Some users need the simplest possible action (trim start/end), others need to cut out a middle section or produce a short social clip. This guide shows three practical routes:
- Super fast: Photos app (no installs).
- More control: iMovie (free from Apple, good for splitting and removing middle parts).
- Advanced or social: Third-party mobile editors and AI clip tools (CapCut, InShot, and AI clip generators).
You’ll get step-by-step instructions, quality tips, and a short recommendation for using an AI clip generator to make demo clips quickly for your blog or social share.
Fastest method — Trim with Photos (best for start/end cuts)
This is the simplest method and works for nearly everyone.
Steps (simple, copyable):
- Open Photos on your iPhone.
- Find the video and tap Edit.
- You’ll see a timeline with frames. Drag the left or right yellow handle to set the new start or end time.
- Tap Done. Choose Save Video (replace the original) or Save Video as New Clip (keep both).
Why this works:
- It’s built into iOS, so no new apps.
- It’s fast for trimming ends.
- “Save as New Clip” keeps the original safe.
Quick tips:
- If you only need to shorten before sharing to social, “Save Video as New Clip” is safer — you preserve the raw original.
- Trimming in Photos does not need heavy re-encoding for simple end cuts, so quality stays good in most cases. (Complex edits or some third-party exports may re-encode.)

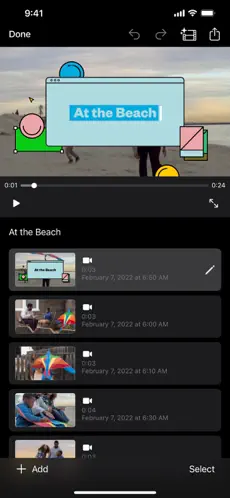
Remove the middle or stitch clips — iMovie (free Apple app)
If you need to cut out a middle section, or keep several short parts and join them, iMovie on iPhone is a clear next step.
What iMovie does well:
- Split a clip at any point and delete segments.
- Move clips around, duplicate segments, and fine-tune trims.
Quick iMovie workflow:
- Open iMovie and create a new Movie.
- Import your video into the timeline.
- Scroll to the point you want to cut and tap the clip to reveal controls. Use Split (or the scissors) to cut.
- Select the unwanted middle segment and delete it.
- Tap Done → Share to export your shortened video.
Pro tips:
- Pinch to zoom the timeline for frame-level precision.
- Export settings: iMovie gives reasonable default quality. If you need a specific resolution/bitrate for upload, check export options or use a specialized app to control encoding.
- Use iMovie if you plan to add titles, simple transitions, or background audio.
Social and precision editing — Third-party apps (CapCut, InShot, etc.)
Some apps make trimming and exporting for social platforms faster. They also let you change aspect ratio, add animated intros, and export with platform-friendly presets.
Common choices:
- CapCut — popular, easy for TikTok/Shorts style clips.
- InShot — simple cut/trim, plus resizing and filters.
- Others like Videoleap, KineMaster, and Splice offer more pro controls.
When to use them:
- You want to crop to vertical formats (9:16).
- You need effects or quick caption templates.
- You want one app to trim, add text, and export in a size ready for Instagram/TikTok.
Basic trimming steps (example, CapCut):
- Open CapCut → new project → add your video.
- Use the timeline to select the part to keep or use split/delete to remove middle parts.
- Export with the preset for your target platform.
Quality note:
- These apps re-encode the video during export. Choose a high export bitrate if preserving visual quality is important.
Make a short demo clip quickly — use an AI clip generator sensibly
If you’re writing a blog or creating a tutorial and you want a quick, short clip extracted from a longer video (for example, to show the trimming result), an AI clip generator can save time.
What these AI clip tools can do:
- Take a longer video or YouTube link and auto-create highlight clips.
- Let you set time windows or use AI to pick the most relevant segment.
- Produce a quick shareable mp4 or vertical snippet for social.
A concrete example: Gstory’s AI Clip Generator offers a way to auto-clip YouTube videos and export trimmed MP4s. If you plan to include demo clips in your article, tools like this speed up sample creation.
Use the tool ethically: respect copyright and use content you have rights to or content that is permitted for clipping.
How to use it for a demo (general steps):
- Upload or paste the source video/YouTube link.
- Choose the desired time window or use the tool’s auto-clip suggestion.
- Review the clip, then export as MP4.
- Embed the clip in your article (host on YouTube or on your site) and add captions.
Preserve quality — smart export tips
Shortening a video can be trivial, but maintaining quality takes a few small choices.
- If using Photos: simple trims usually keep original quality for end cuts. But complex edits in third-party apps will re-encode. Test export quality vs original.
- Choose the right resolution: for social, 1080×1920 (vertical) or 1920×1080 (landscape) is standard. For higher fidelity, export at the original resolution.
- Bitrate matters: higher bitrate = better quality, larger file. If your app gives bitrate options, pick a medium to high setting for clearer results.
- Frame rate: keep the original frame rate (30/60 fps) unless you specifically need slow-motion adjustments.
- Preview before sharing: always watch the exported clip on the same device your audience will use.
Workflow examples for common needs
A. Shorten for a quick text message or email
- Use Photos → trim → Save Video as New Clip. Send the new clip.
B. Cut out an awkward middle bit (loud noise, pause, mistake)
- Use iMovie: split at start and end of the bad section → delete → export.
C. Make a 30-second highlight for Instagram Reels/TikTok
- Use CapCut: set aspect ratio to 9:16 → trim to 30 seconds → add captions → export with social preset.
D. Create a demo clip from a YouTube tutorial to show on your blog
- Use an AI clip generator to extract a 20–60s sample, then host it on YouTube or your site and embed it. This is faster than manual downloads and edits in many cases. Be careful about copyright.
Common problems and how to fix them
Problem: “My trimmed video won’t save.”
Fix: Check iPhone storage, then try Save as New Clip. If it still fails, export from iMovie instead.
Problem: “The exported clip looks fuzzy.”
Fix: Use a higher export setting or keep the original resolution/frame rate when exporting. Some apps default to low bitrate for smaller files — change that in settings.
Problem: “How do I keep slo-mo parts when trimming?”
Fix: Edit slow-motion sections using the slow-motion controls inside the Photos edit view for slo-mo videos.
Problem: “I want to remove frames from the middle but leave everything else in place.”
Fix: Use iMovie’s split/delete, or a third-party editor with timeline editing capabilities.
Example short FAQ (good to include on the page and as JSON-LD)
Below are three FAQ items to add to your page (you can convert these into JSON-LD for structured data):
Q: Can I shorten an iPhone video without an app?
A: Yes — use the Photos app: open the video → Edit → drag handles → Done → Save Video or Save Video as New Clip.
Q: How do I remove a middle section from a video?
A: Use iMovie (free). Import the clip, split at the start and end of the unwanted section, delete it, then export.
Q: Will trimming a video reduce its quality?
A: Simple trims (cutting start/end) usually keep original quality in Photos. Complex edits or exports from some apps may re-encode and reduce quality — choose higher export settings if you need the best result.
Closing — quick summary
- For most readers, Photos is the fastest way to shorten an iPhone video.
- For deleting middle sections and finer control, iMovie is Apple’s recommended free tool.
- Use CapCut/InShot for social formatting and templates, and consider an AI clip generator for ultra-fast demo creation.
Leave a Reply