Last Updated on December 24, 2025 by Leslie
You’re here because you typed something like “fix blur in video ai” at 1:12 a.m., stared at your clip, and thought: “Why does this look like it was filmed through a steamed-up bathroom mirror?”
Totally fair. And also: “blurry” is a sneaky word. It can mean motion blur, focus blur, low-light noise pretending to be blur, or “this got compressed 14 times on the way to WhatsApp” blur. If you pick the wrong fix, you don’t get an ai fix blurry video miracle—you get a sharper-looking mess (hello, crunchy faces and halo outlines).
This guide gives you a beginner-safe way to make a blurry video clear, by choosing the right tool in the right order: unblur vs sharpen vs denoise, plus how to avoid that weird “AI made everyone look like a wax statue” effect.
Fix Blur in Video AI: What People Mean When They Say “It’s Blurry”
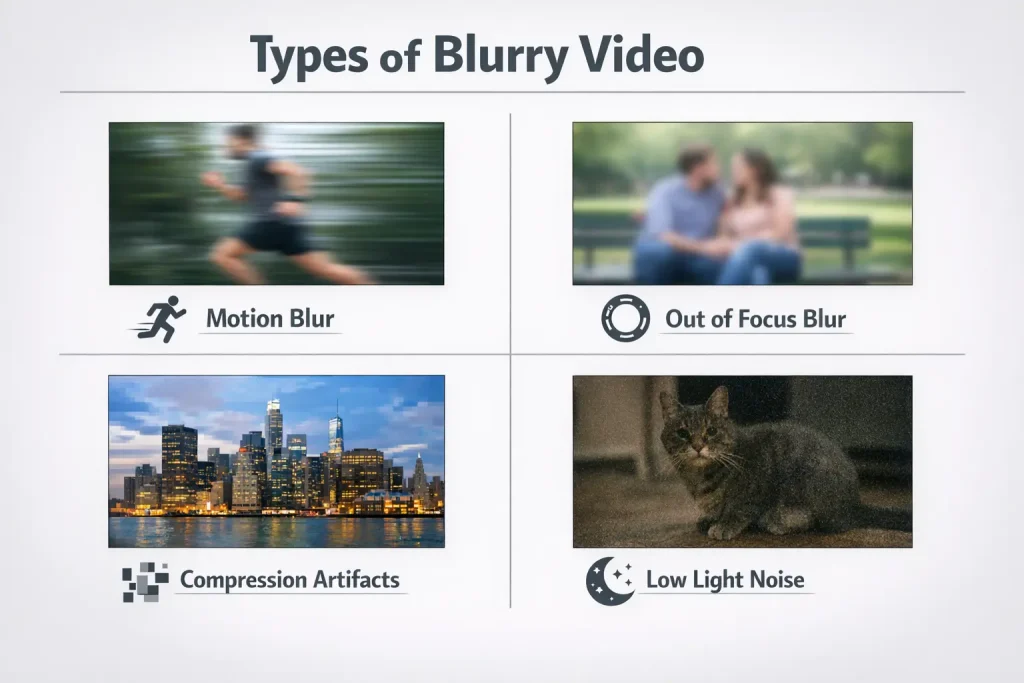
“Blurry” is usually one of these four problems:
Blur symptoms that matter
- Soft everywhere, like it can’t “lock in” detail
This often points to out-of-focus blur or low resolution (not enough real detail to begin with). - Smears when things move
That’s typically motion blur (the camera captured movement during exposure). AI can help, but motion blur is the hardest type to truly “restore.” - Blocky / mushy texture, especially in shadows
That’s usually compression blur (low bitrate, heavy re-uploads, messaging apps). You’ll see chunky blocks and smeared gradients. - Grainy, crawling noise that makes everything look soft
That’s low-light noise. If you “sharpen” noise, it looks worse. You usually need denoise first.
The “I tried everything” trap
A common pattern: people try a little bit of everything—sharpen in a player, “magic enhance” in a consumer editor, an “unblur video online free” tool—then wonder why nothing sticks.
The trap is simple: most one-click tools apply sharpening first (or too aggressively). If the real issue is noise, compression blocks, or shaky micro-jitter, sharpening just makes the ugliness louder.
The fix isn’t “more tools.” It’s better diagnosis.
Unblur vs Sharpen vs Denoise: Pick the Right Fix Before You Touch Any AI
Think of these as three different jobs:
- Denoise = remove random grain/texture so real edges can show
- Deblock / deartifact = reduce compression blocks/smears
- Sharpen / unsharp mask = increase edge contrast (can look “clearer,” but can also create halos)
- Unblur / deblur (often what people mean by “unblur video ai”) = attempt to recover detail lost to blur (harder than sharpening)
Motion blur vs out-of-focus blur
Motion blur happens when the subject/camera moves while the frame is being captured. The blur has direction (a smear). AI can sometimes reduce it, but heavy motion blur is often “baked in.”
Out-of-focus blur is when the lens never captured a crisp image. AI unblur can help more here than with motion blur—but there’s still a limit. If the camera never recorded eyelashes, AI can’t “remember” them.
Quick rule:
- If blur appears only during movement → motion blur
- If blur is constant even when still → focus/low-res/compression/noise
Compression blur and “blocky” footage
If your clip looks okay in bright areas but falls apart in shadows, or the background turns into mush, you’re fighting compression.
In that case, search terms like “blur remove from video” can be misleading—because the best first step is often deblock / artifact reduction, not unblur.
Signs it’s compression:
- “Minecraft blocks” in gradients
- Smearing around faces during motion
- Text becomes unreadable even when the scene is still
Low-light noise that looks like blur
Noise makes edges less clear, so people call it blur. But noise is random, so sharpening it creates sparkly skin and crunchy shadows.
If your video was shot at night, indoors, or on an older phone, denoise is usually step one. After that, even a gentle sharpen can look dramatically better.
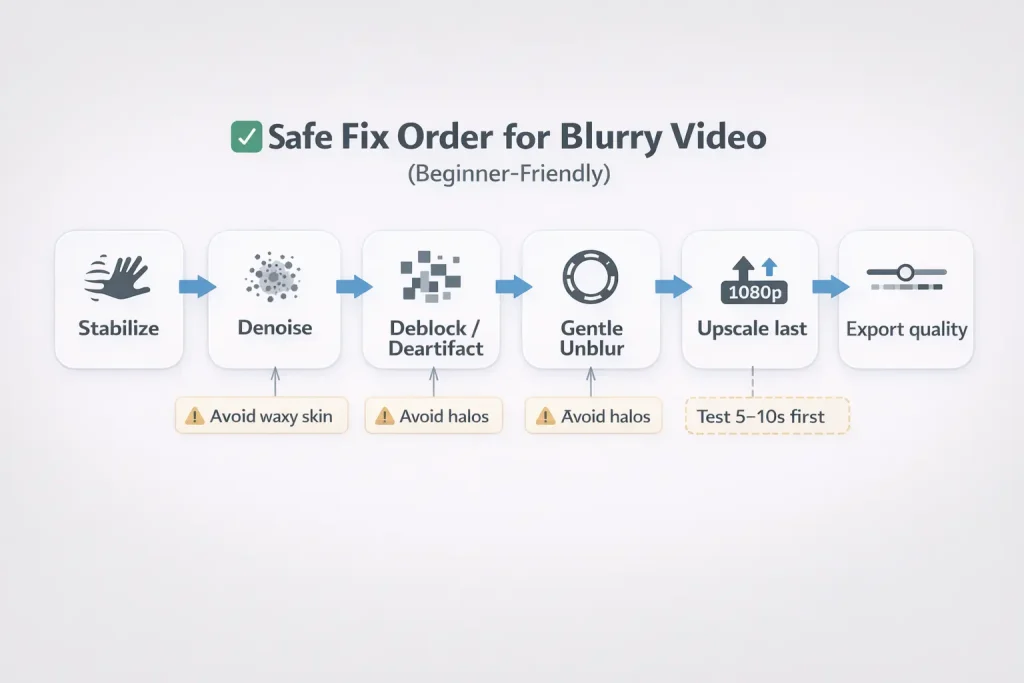
Make a Blurry Video Clear: The Safe Fix Order That Avoids Overprocessing
If you want ai video clearer results without turning your clip into a sci-fi hallucination, use this order:
Stabilize first (when jitter is the real blur)
Micro-jitter (handheld shake) creates “shimmer” that feels blurry. Stabilizing first can make everything cleaner because edges stop vibrating.
Beginner-safe tip:
- If your clip “buzzes” even when nothing is moving, stabilize before anything else.
- If stabilizing warps the image (rubbery edges), dial it down or skip it.
Denoise before unblur
Denoise is like cleaning a dirty window. If you unblur first, the AI may “invent” details inside noise.
Beginner-safe denoise approach:
- Start with low to medium denoise
- Watch for “plastic skin” or waxy texture—if you see it, back off
Gentle unblur video ai settings
Here’s the truth: the best unblur is usually subtle. You’re aiming for “more readable,” not “4K cinema from a 240p clip.”
Start gentle:
- Low strength deblur/unblur
- If you see halos (bright outlines around objects), reduce sharpening/unblur
- If faces look strange, reduce strength and prioritize denoise + deblock instead
Upscale last for ai video clearer results
Upscaling first can enlarge problems. Upscaling last gives the AI a cleaner base to work with.
Also: a lot of “my upscale looks worse” complaints are actually export settings. If you upscale to HD/4K but export at a tiny bitrate, your final file gets re-blurred by compression.
Beginner-safe export guideline:
- If your tool lets you choose quality/bitrate, don’t pick the lowest option for “speed.”
Why AI Fix Blurry Video Sometimes Looks Fake
AI enhancement is powerful, but it’s not a time machine. The most common “this looks fake” problems are totally predictable.
Faces go uncanny: what triggers it
Uncanny faces happen when the tool tries too hard to “reconstruct” detail:
- Heavy unblur/sharpen on low-res faces
- Strong denoise that smooths skin, then sharpen that adds weird edges
- Upscale + face detail “enhancement” that invents texture
How to prevent it:
- Keep face-heavy clips on lower enhancement strength
- Prefer denoise + mild deblock over aggressive unblur
- If your tool has “face protection” or “natural” mode, use it
Reality check:
- If a face is only 40 pixels wide in the original, no setting can create true detail. The goal becomes: less distracting, not “perfect.”
Flicker/ghosting between frames
Flicker happens when AI improves each frame slightly differently. You’ll see:
- Skin texture changing frame to frame
- Edges “swimming”
- Ghost trails after fast movement
How to reduce it:
- Lower enhancement strength
- Shorten the clip and test a small segment first
- If the tool offers temporal consistency / video mode vs image mode, use video mode
When to stop: signs you’ve pushed too far
Stop (or back off) if you see:
- Halo outlines around people/objects
- Skin turning waxy or overly smooth
- Hair becoming “painted”
- Moving edges shimmering like heatwaves
A good enhancement feels boring in the best way: cleaner, not alien.
Blur Remove From Video on a Budget: What to Do When Tools Crash, Watermark, or Compress
Not everyone has a beast computer or a paid suite. The goal here is realistic: get the best improvement per minute (and per dollar).
“Online free” pitfalls (watermarks + re-compression)
Many “free” tools:
- Add watermarks on export
- Force low-resolution downloads
- Re-compress so hard that your “enhanced” video looks softer than before
Safety-first habits:
- Test with a 5–10 second clip before uploading the full video
- Compare the download to your original at 100% zoom (don’t trust tiny previews)
- Avoid sites that hide downloads behind fake buttons/pop-ups
Low-spec laptop survival settings
If your editor crashes or your laptop wheezes like it’s running a space program:
- Work in short chunks (10–30 seconds)
- Use lower preview quality while editing
- Apply denoise/unblur on the final render only (if using a classic editor)
- Consider browser-based enhancement for heavy lifting (upload → process → download), then do light edits locally
Quick Decision Guide: Which Unblur Path Fits Your Clip (Old Phone, Social, Interview, Action)
Different clips need different priorities. Here are three “paths” that match real-life use cases.
Old phone footage rescue
Goal: make it cleaner and less embarrassing (not cinematic).
Best path:
- Denoise (light)
- Deblock / artifact reduction (if available)
- Gentle unblur (very low)
- Upscale (moderate)
- Export at decent quality
This is where you usually get the biggest “wow” because the original is so rough.
Talking-head clarity without plastic skin
Goal: readable face and natural skin.
Best path:
- Denoise (very gentle)
- Minimal sharpen (or mild unblur)
- Avoid aggressive upscaling on the face area
- Export carefully
If you must choose one: clean noise first, then a tiny bit of clarity.
Fast motion clips (sports, pets, kids)
Goal: reduce distraction, keep motion natural.
Best path:
- Stabilize (if handheld)
- Deblock + denoise
- Skip heavy unblur (motion blur hates being “fixed”)
- Upscale lightly
For action footage, “less blur” often means “less compression + less noise,” not magical de-motion-blur.
Try GStory to Get AI Video Clearer (Without Turning It Into a VFX Project)
If what you want is: upload → get ai video clearer → download, the simplest path is to use an online enhancer that combines the basics (denoise + unblur-ish clarity + upscale) without you learning a full editing suite.
GStory’s browser-based tool is here: GStory AI Video Enhancer. It’s positioned to improve resolution, sharpness, brightness, and more, and supports common formats like MP4/MOV (with limits shown on the page).
The simplest workflow to fix blur in video AI with GStory
- Open GStory AI Video Enhancer.
- Upload a short test segment first (5–10 seconds) so you can judge whether the result stays natural.
- Run enhancement, then compare before/after at 100% zoom—especially faces, hair, and text.
- If it looks too “crispy” or artificial, reduce how hard you push enhancement (or focus on denoise/deblock-first workflows).
- Download the improved file, then do your normal edits (cuts, captions, music).
If you want extra context before you enhance, GStory also has practical reads like Can You AI Enhance Videos? Real Results & Easy Fixes that set expectations about what AI can and can’t do.
Final sanity check (so you actually win)
If you remember only one thing: “blurry” is a diagnosis problem, not a button problem.
When you match the fix to the blur type—and apply it in the safe order—you get results that look cleaner and more real, not louder and weirder.
If you tell me what kind of clip you’re fixing (old phone / interview / sports / night footage) and where it looks worst (faces / text / shadows), I can recommend the best path and what to avoid—without turning your night into a 47-tab research project.
Leave a Reply