Last Updated on January 9, 2026 by gaojie
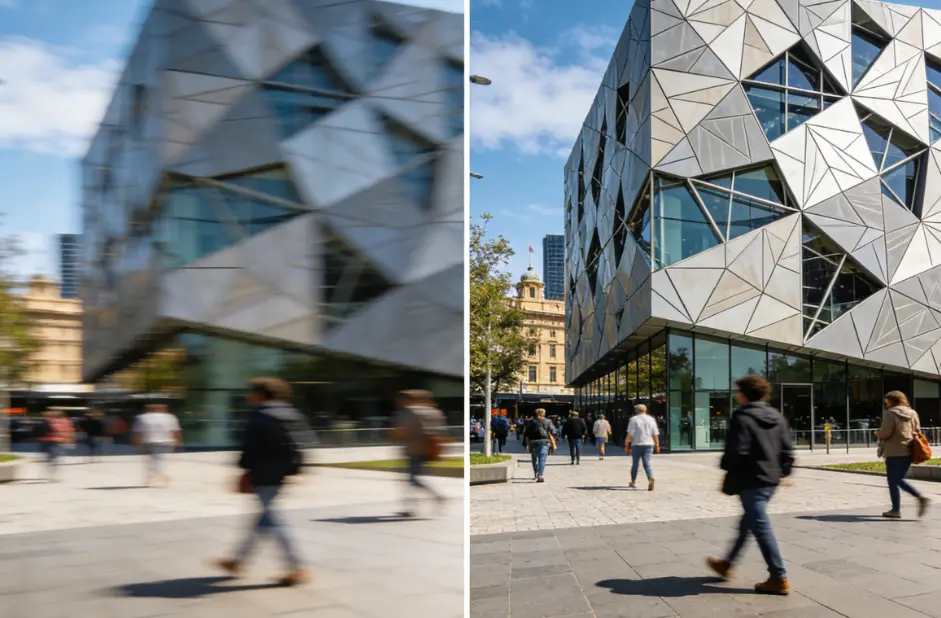
If your phone clips look fuzzy, your old home videos feel grainy, or YouTube uploads lose detail, you can meaningfully improve video quality for free—often without complicated software. This article walks you through why videos look bad, what free tools actually help, step-by-step fixes you can do today, and what to expect from AI enhancers. Along the way I explain simple settings you can copy and paste so you won’t feel overwhelmed.
Why videos look bad
Three common reasons your video looks low quality:
- Low resolution / compression — The original file may have few pixels or was compressed by apps (like messengers or old uploads).
- Noise and blur — Low light and camera shake create grain and blur.
- Wrong color / contrast — Colors or brightness can make the image look flat or muddy.
Knowing which problem you have makes it easier to choose the right fix (upscale, denoise, sharpen, or color-correct).
How modern “video enhancers” help
Modern tools use AI to do three main things:
- Denoise — remove tiny specks and grain from low-light video.
- Upscale / super-resolution — create extra pixels so the image looks sharper at higher sizes (e.g., 480p → 1080p or 4K).
- Sharpen / detail recovery — restore edges and faces so things appear clearer.
These actions are not magic: they guess plausible detail from surrounding frames. With good footage the results can look excellent; with very low-quality sources, improvements are limited.
Best free tools you can try today
Below are free or freemium tools that many creators use. I list what they do best and one quick tip for each.
GStory — browser-based, one-click enhancer (great for quick fixes)
GStory’s online Video Enhancer lets you drag-and-drop, upscale to 4K, reduce noise and improve brightness directly in the browser — no install required. It supports common formats (MP4, MOV, MKV) and has a clear “Process” flow for fast results. Use it when you want a fast, simple fix without learning complex software.
Quick tip: Upload a short 10–30 second sample first (GStory supports up to 500MB / 10 minutes) to preview how your specific clip will improve.
CapCut — free online 4K upscaler and easy mobile/desktop workflows
CapCut’s AI video upscaler is available online and in the mobile app. It does a reliable job upscaling and denoising for social videos and is friendly for beginners. If you already edit in CapCut, trying the AI upscaler inside that workflow is fast and free.
Quick tip: Use CapCut for social clips—choose the “4K Upscale” preset and let it process; then compare before/after on your phone before exporting a large file.
Topaz Labs (web tools & trial) — strong local/web AI models for serious restoration
Topaz is known for best-in-class upscaling and denoising. They offer web tools and trial versions of their desktop software that can produce very detailed results—especially good for archival footage or footage with faces. Note: full desktop suites may be paid, but free trials or web demos let you test results first.
Quick tip: Try a short clip on Topaz’s web tool or trial first; if faces are important, pick a face-focused model/preset and reduce extreme sharpening to avoid weird artifacts.
YouCam (Perfect Corp) — online 4K upscaler and easy UI
YouCam’s AI video enhancer advertises fast 4K upscaling, unblurring faces, and basic denoise. It’s a handy browser option if your main goal is cleaning up personal clips and faces. As with any online tool, check upload limits and privacy notes.
Quick tip: If your clip contains people, test the “face enhancement” mode first, and avoid over-upscaling extremely small faces (it may invent details).
Free/open options & small web upscalers (good for short tests)
There are many lighter web upscalers (Wink, X-Design, UniFab lists several free AI upscalers). These are useful for quick trials when you don’t want to install anything. Results vary by clip type—live action faces vs. cartoons vs. text on screen. Use them for short clips (under 1–2 minutes) to test results.
Quick tip: Try two different tools on the same clip and compare side-by-side—different AI models make different choices about detail vs. smoothness.

Safety & privacy: what to watch for with online enhancers
Uploading personal videos to cloud services is convenient but consider:
- Privacy policy — read how the service stores or uses your video. GStory and many web tools clearly publish privacy/support pages; check them before uploading sensitive content.
- Watermarks / limits — free tiers often add watermarks, caps on length, or file size limits. Topaz and others may offer free trials without watermarks, while some tools give limited free credits.
If privacy is critical, prefer local desktop tools (Topaz desktop) or process files offline.
A practical, no-nonsense 6-step workflow to improve video quality for free
Follow these simple steps. They’re written so anyone (middle-school level) can follow.
1. Make a tiny test clip (10–20s).
Trim the most typical part of the video—this saves time and lets you compare tools quickly.
2. Analyze the problem.
Is it low-res? noisy? shaky? If it’s shaky, prioritize stabilization. If it’s grainy, try denoise first.
3. Try an online free enhancer (GStory or CapCut) for a quick pass.
Use one-click or the default preset to get a baseline. Download the result and compare.
4. If faces are important, test a face-focused enhancer (YouCam or Topaz).
Face models often do a better job restoring facial detail and eyes. Compare results at 1:1 zoom.
5. Do light color and sharpening in a simple editor (free editors: Shotcut, or CapCut).
Small contrast and saturation boosts plus a tiny sharpen (slider < 10%) can make the result pop without artifacts.
6. Export with appropriate settings.
Export at the resolution you want (1080p or 4K) and use a reasonable bitrate (for 1080p, 8–12 Mbps is fine for web; for 4K, 25–50 Mbps). If you’re uploading to YouTube, use their recommended settings. (Tip: avoid extreme compression afterward—re-uploading through a phone messenger can undo gains.)
Settings cheat-sheet
- Upscale target: 1920×1080 for social, 3840×2160 for 4K archival.
- Sharpen: start at 5–10%, increase only if edges look soft.
- Denoise: remove most noise but keep a little film grain to avoid plastic look.
- Frame interpolation (slow motion): use moderate settings; extreme frame creation can look unnatural.
- Export bitrate: 1080p = 8–12 Mbps, 4K = 25–50 Mbps.
Realistic expectations — what AI can and can’t do
- Can: remove moderate noise, make edges look clearer, increase resolution for watching on larger screens, and produce nicer-looking social clips.
- Can sometimes: recover some lost detail if the video has good original information.
- Can’t: invent perfectly accurate detail out of very blurry low-quality footage (for example, you can’t recover an unreadable license plate from extreme blur and expect a guaranteed accurate result). AI makes plausible detail, not guaranteed true detail.
If your clip is extremely damaged (very low resolution, heavy motion blur, or extreme compression artifacts), expect only moderate improvement. This is an important reality check many tutorials skip. (Topaz and community reports discuss trials and limits of restore tech.)
Quick comparison
- GStory — browser-based, one-click 4K upscaler; great for quick fixes.
- CapCut — free online & mobile 4K upscaler; easy workflow for social posts.
- Topaz — top-quality denoise/upscale (desktop + web); stronger for archival work; trials available.
- YouCam — face-focused enhancer and upscaler; simple UI for people-centric clips.
- Small web tools (Wink / X-Design / UniFab lists) — quick tests, mixed results, useful for sampling options.

Bonus: common mistakes and how to avoid them
- Mistake: Upscaling everything to 4K blindly.
Fix: Upscale only if you need to show on large screens; otherwise 1080p + quality color correction often looks better. - Mistake: Over-sharpening.
Fix: Use subtle sharpening. If you see halos around edges, dial back. - Mistake: Uploading the only copy of a sentimental clip.
Fix: Always work on a copy. Keep the original file safe.
Final checklist before you hit “Process”
- Trim to a short test clip.
- Check format and file size.
- Choose one enhancer (GStory or CapCut for speed).
- Compare two results at 1:1 zoom.
- Make light color & sharp adjustments if needed.
- Export at the right bitrate and resolution.
Pick the right tool for your goal
If you want fast, no-install fixes for social clips, start with browser tools like GStory or CapCut. If you need serious restoration for archival footage, test Topaz’s trial or consider a desktop AI pipeline. Always test with a short clip and keep expectations realistic: AI helps a lot, but it doesn’t produce perfect forensic recovery from extremely poor originals.
Leave a Reply