
Last Updated on September 20, 2025 by gaojie
If you’re wondering how to remove background in Illustrator, you’re not alone. Many beginners struggle with white boxes around their artwork, unsure which tool to use or how to get a clean, transparent export.
Here’s the truth: removing a background in Illustrator can seem intimidating, but once you know the logic behind how Illustrator works, it becomes simple—and even fun. In this guide, we’ll start with beginner-friendly methods, then move on to pro-level techniques to get crisp edges, smaller file sizes, and faster workflows. We’ll also compare Illustrator to Adobe Photoshop, Canva, and GStory, so you know exactly when to use each one.
How to Remove Background in Illustrator: 3 Beginner-Friendly Methods
Let’s start with the hands-on part. There are three reliable ways to get rid of a background in Illustrator. Each one works best in certain situations.
Image Trace + Expand (Best for logos and clipart)
Imagine you’ve scanned a hand-drawn logo and it’s sitting on a white background. The fastest way to isolate it is to convert it into editable vector shapes.
Here’s how: place your image into Illustrator and select it. Open the Image Trace panel (Window → Image Trace). Pick a preset like “Black and White Logo” or “High Contrast.” Click “Trace.” When the preview looks clean, hit the “Expand” button on the top toolbar. Illustrator will break the image into vector shapes. Ungroup them (Object → Ungroup), click the white background shape, and press Delete.
In one swoop, your logo becomes a background-free vector you can scale to any size. Pretty satisfying, right?
Magic Wand Tool (Best for solid-color backgrounds)
If your image has a clean, single-color background, the Magic Wand is like a smart selection brush. Click on the background color, and Illustrator will grab all areas of that color. If it misses spots, increase the Tolerance setting in the top bar. When everything’s selected, hit Delete.
It’s quick and painless, especially for product photos or illustrations with sharp edges. Just be aware it struggles with soft gradients or shadows.
Pen Tool + Clipping Mask (Best for complex shapes)
Sometimes there’s no shortcut. If your subject has curly hair, flower petals, or wild outlines, you’ll get the cleanest result by drawing around it with the Pen Tool.
Click point by point around the object to make a path. When the path closes, select both the path and the image, right-click, and choose “Make Clipping Mask.” Everything outside your path disappears, leaving only your subject.
It takes patience, but the control is unmatched. Think of it as sculpting your image instead of hacking away at it.
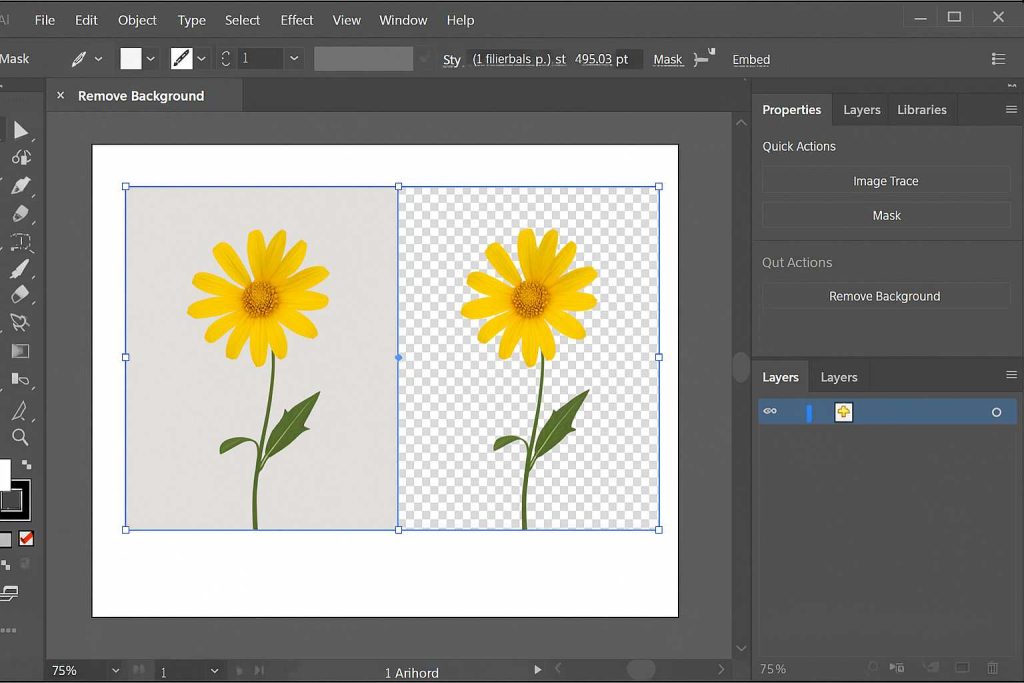
How to Remove White Background in Illustrator and Export Transparently
Here’s a classic frustration: you do everything right, export as PNG, and… the white box is back.
This happens because by default, Illustrator shows a white artboard behind everything—even if your design is actually transparent. To double-check, go to View → Show Transparency Grid. If you see a gray checkerboard behind your art, you’re safe.
Then go to File → Export → Export As → PNG. Make sure you tick “Use Artboards” and “Transparent Background.” The same goes for SVG or EPS if you’re preparing files for print or the web.
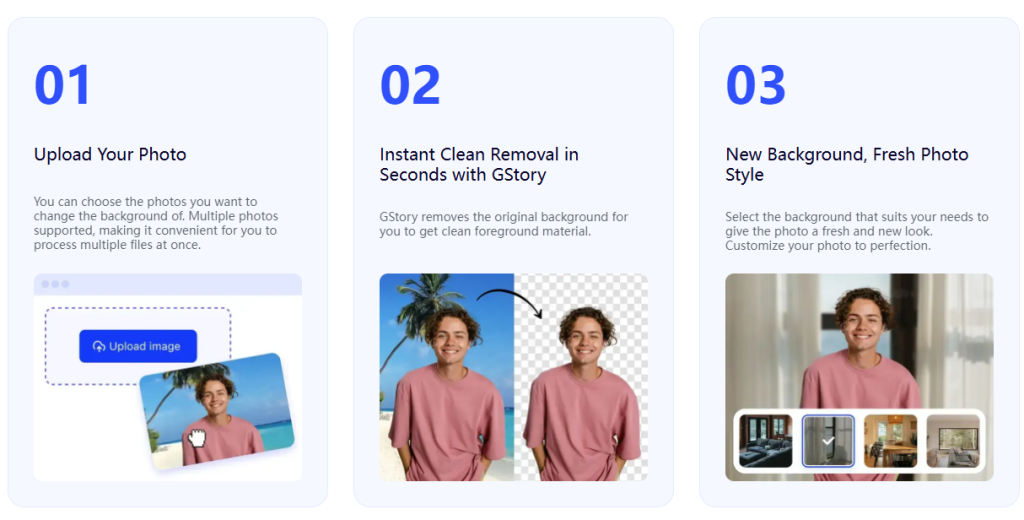
💡 Quick tip: If you’re in a hurry or working on many images, GStory offers a powerful online Photo Background Remover + Enhancer. Upload your image (PNG, JPG, or WEBP), let GStory automatically erase the white background, and even upscale it with the built-in 4K photo enhancer. It’s 100% browser-based, requires no installation, and even the free plan gives you credits to try a few images—perfect if you want clean transparent PNGs before bringing them into Illustrator.
A few extra clicks now can save you hours of confusion later.
How to Remove Background in Adobe Illustrator Like a Pro
Okay—this is where we move from beginner to advanced.
If you’ve used Image Trace, you might notice the edges of your shape look jagged or bumpy. That’s because Image Trace creates hundreds (sometimes thousands) of anchor points. More points mean bigger file sizes and rougher edges.
Here’s how the pros fix it: after tracing, go to Object → Path → Simplify. This will reduce the number of anchor points and smooth the curves. You can also use the Smooth Tool (hidden under the Pencil Tool) to manually polish wobbly lines.
Another trick is separating your shadows. If your object has soft shadows, keep them on a different layer and lower their opacity. This keeps the main edges sharp without losing depth.
And for super fine details—like fur, feathers, or hair—zoom in and manually clean the edges with the Eraser or redraw the outline with the Pen Tool. It’s slow, but the result looks infinitely more professional.
Think of it like grooming a pet: a little trimming goes a long way.
How to Work Faster: Presets, Actions, and Batching
If you remove backgrounds regularly, speed becomes a big deal. Nobody wants to repeat the same steps 50 times a day.
Here’s a time-saving trick: record an Action (Window → Actions). Start recording, run through your steps—Image Trace, Expand, Ungroup, Delete—then stop recording. Now you can run that same process on any new image with a single click.
For multiple images, place them all on one artboard, run your Action on each, and export them together.
And if you work with giant, high-resolution images that make Illustrator crawl, rasterize them at a lower resolution first (Object → Rasterize), run Image Trace, then swap back in the full-resolution version. This prevents Illustrator from choking on millions of points.
Once you’ve built your own “remove background” workflow, you’ll wonder how you ever lived without it.
Illustrator vs Adobe Photoshop vs Canva — Which One Should You Use?
Let’s be real: Illustrator isn’t the only tool in town. So when should you actually use it for background removal?
Illustrator shines for vector graphics—logos, icons, line art, and anything that needs to stay crisp at any size. It gives you editable shapes forever. But it’s not great with soft edges, hair, or photorealistic subjects.
Adobe Photoshop, on the other hand, is perfect for raster images like portraits or detailed product shots. Its “Select Subject” and “Remove Background” tools are incredibly accurate. The tradeoff: the result is pixels, not vector shapes, so scaling can blur them.
Canva (and tools like remove.bg) are lightning fast—click once and the background disappears. The downside is you get a flattened image you can’t edit deeply.
GStory sits somewhere between speed and control. It’s entirely browser-based, so there’s nothing to install. Its Photo Background Remover gives quick, clean results when you’re dealing with white or simple backgrounds. Plus, its photo enhancer/upscaler ensures that even low-quality phone images look sharp—making them easier to trace or convert inside Illustrator. If you need to prep many images quickly, or want a backup plan when Illustrator is overkill, GStory is a strong companion.
So here’s a rule of thumb:
- Use Illustrator if you need clean, scalable shapes.
- Use Photoshop if you need high-precision cutouts from photos.
- Use Canva or GStory if you want something fast and beginner-friendly.
Troubleshooting: Fixing the Most Common Problems
Even experienced designers hit snags. Here’s how to dodge the big ones:
Your PNG still has a white background.
Double-check that you checked “Transparent” during export. Also, make sure you don’t have a hidden white rectangle behind your design—Ungroup everything and look carefully.
The Magic Wand won’t grab the whole background.
Increase the Tolerance number. Sometimes the background isn’t perfectly uniform, so a higher setting (like 50 instead of 20) will catch the variations.
Your file is enormous and laggy after tracing.
Run Object → Path → Simplify to cut down the anchor points. Fewer points = smaller file size and smoother edges.
The edges look jagged.
Use the Smooth Tool or add a tiny feather (Effect → Stylize → Feather at 0.3 px) to soften the edge without making it blurry.
Each of these fixes takes less than a minute—and can rescue hours of work.
Final Thoughts: Practice Makes Smooth Cutouts
Removing backgrounds in Illustrator isn’t just a technical task—it’s a little art form of its own. The first time will feel clumsy. The second time will be faster. By the third, you’ll be cruising.
Remember:
- Pick the method that fits your image.
- Check your transparency grid before exporting.
- Clean your edges and simplify your paths.
- Automate what you can.
If you do, you’ll not only get rid of that stubborn white box—you’ll get artwork that looks polished, professional, and ready for anything from social media to billboards.
And when your friends ask how you made your designs look so sharp, you can just smile and say, “Trade secret.”
⏩ What’s Next
Now that you know how to remove backgrounds cleanly, try saving your favorite settings as presets and recording an Action for one-click cutouts. It’ll make every future project faster.
And if you ever want to skip manual setup or batch process many images at once, give GStory a try. Its AI Background Remover + Photo Enhancer tools work seamlessly in your browser, helping you clean up photos, upscale them, and prepare perfect elements for Illustrator. It can serve both as a time-saving pre-processing step and as a fallback when you just need something fast.
And if you ever need a refresher or want to explore more advanced tricks, the official Adobe Help Center has tons of videos and guides. Bookmark it—you’ll thank yourself later.