Last Updated on September 4, 2025 by Leslie
As an SEO content creator, I often watch videos, whether from YouTube, webinars, or other platforms, to gather insights and expand them into blog posts. But let’s be honest: when you’re dealing with a 30-minute video packed with information, manually pausing, replaying, and jotting down key points can be a huge time sink. That’s why having a fast, accurate way to create transcript from online video has become essential in my workflow. Below are a few methods I’ve personally used and found effective, I’d love to share them with you.
Why You Need Get YouTube Transcript From Video Online?
Before introducing the methods, I want to say that YouTube transcription isn’t just useful for the scenarios I mentioned above. In fact, getting a transcript from a video can help in many other ways: it improves accessibility for people with hearing impairments, makes it easier to translate content into different languages, boosts SEO by providing text for indexing, and allows viewers to quickly scan content without watching the entire video. Whether you’re a student, content creator, marketer, or just someone trying to extract useful information from long videos—having the ability to turn video into text can be a game-changer.
How to Get Transcript of YouTube Video?(Step by Step)
Here comes the most important part, be sure to follow along patiently! Once you master these methods, you’ll be able to extract transcripts from YouTube videos quickly and efficiently, saving tons of time whether you’re writing blog posts, summarizing content, or translating video dialogue.
YouTube Built-in Transcript (Only works if the video already has subtitles)
If the video has subtitles enabled (either uploaded by the creator or auto-generated), YouTube provides a built-in transcript function that’s super easy to use.
If the video has subtitles enabled (either uploaded by the creator or auto-generated), YouTube provides a built-in transcript function that’s super easy to use.
- First, open the YouTube video you want to transcribe. Scroll down to the video description area, and look for the “more” button. Click it to open a small menu.
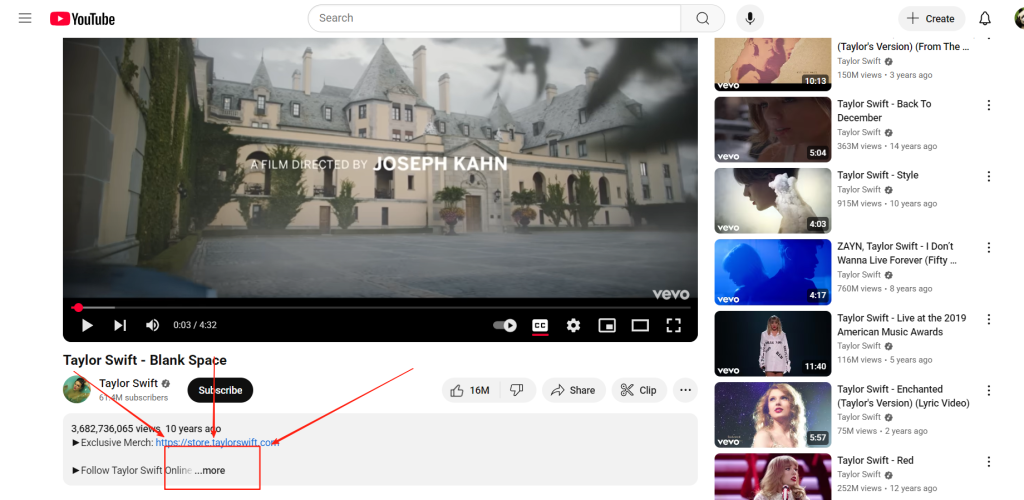
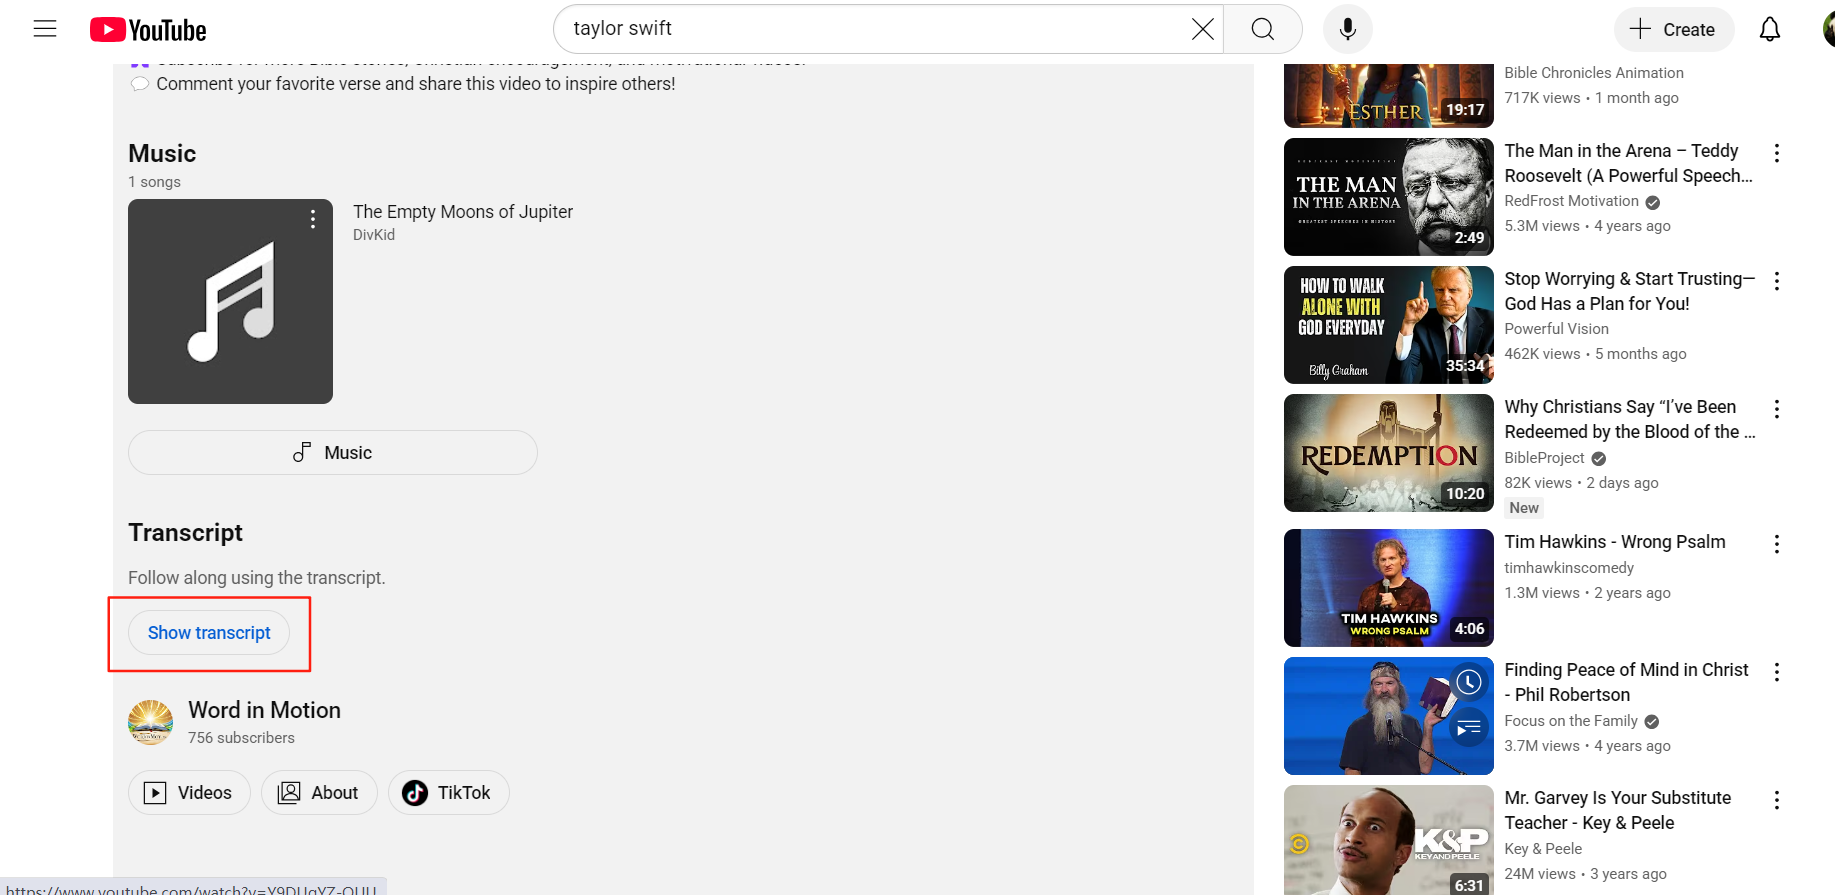
- In that menu, you’ll see an option that says “Show transcript.” Click on it, and YouTube will automatically open a transcript panel on the right side of the video.
- The full transcript will appear there, usually with timestamps beside each line. It’s based on the subtitles from the video, whether they were uploaded by the creator or auto-generated.
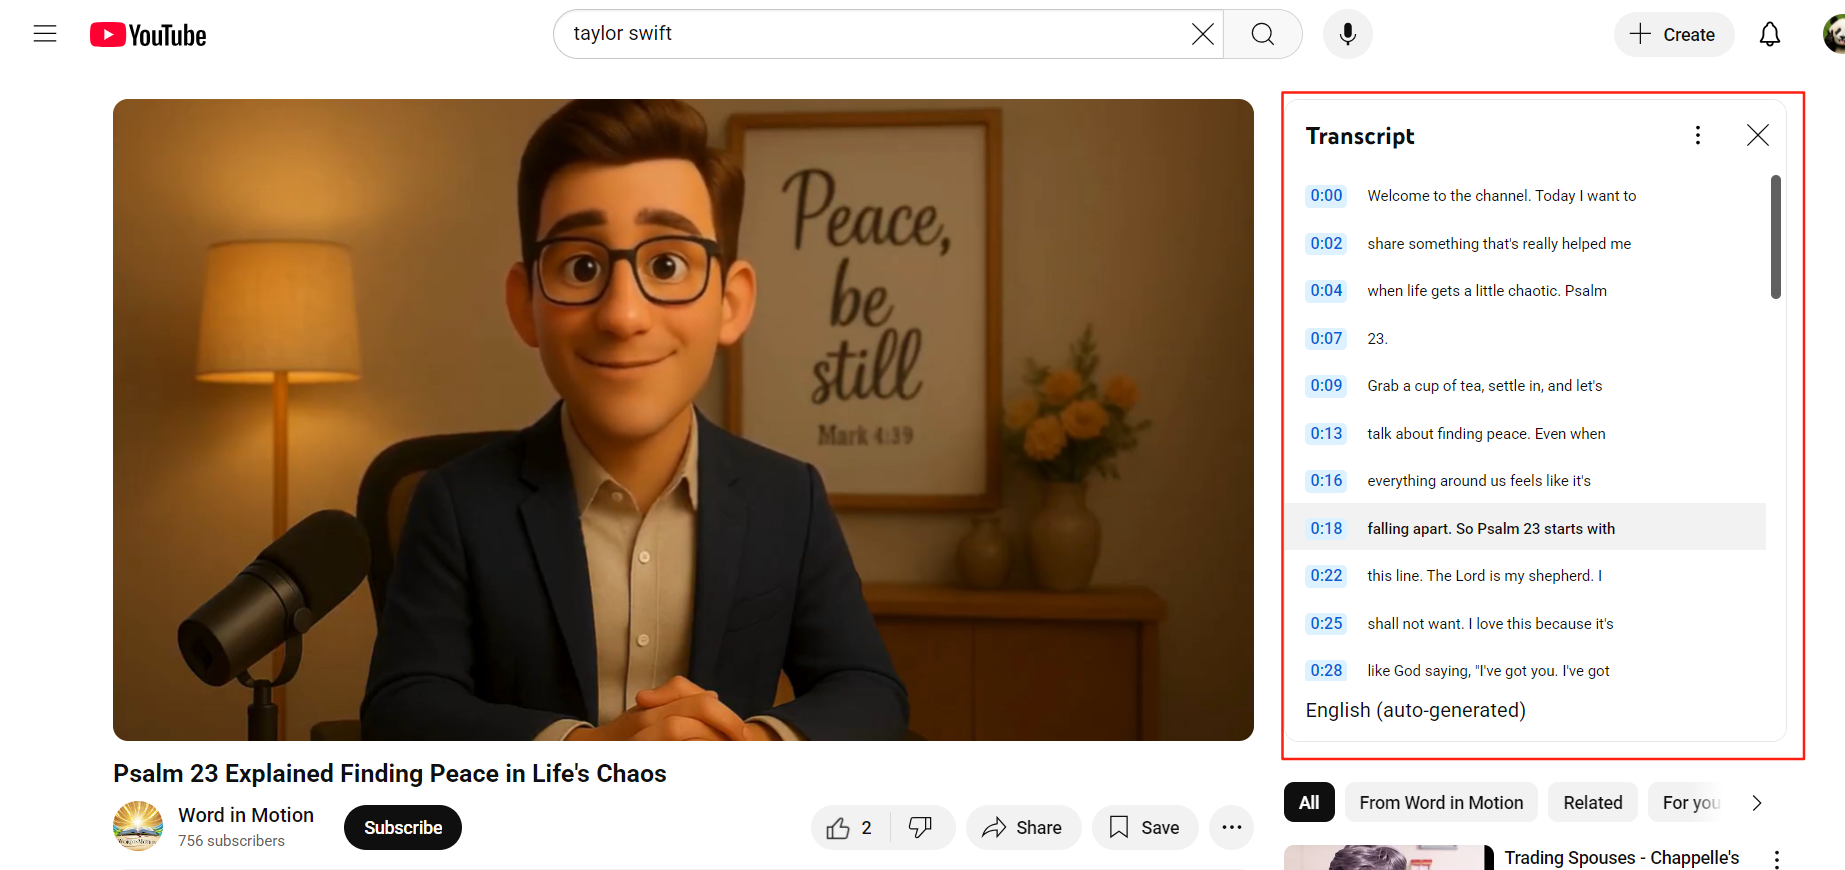
- From there, you can just highlight all the text and copy it into your notes, Word document, or blog draft. If you don’t want the timestamps, there’s a little settings icon in the transcript box—just click it and uncheck “Show timestamps” to clean things up.
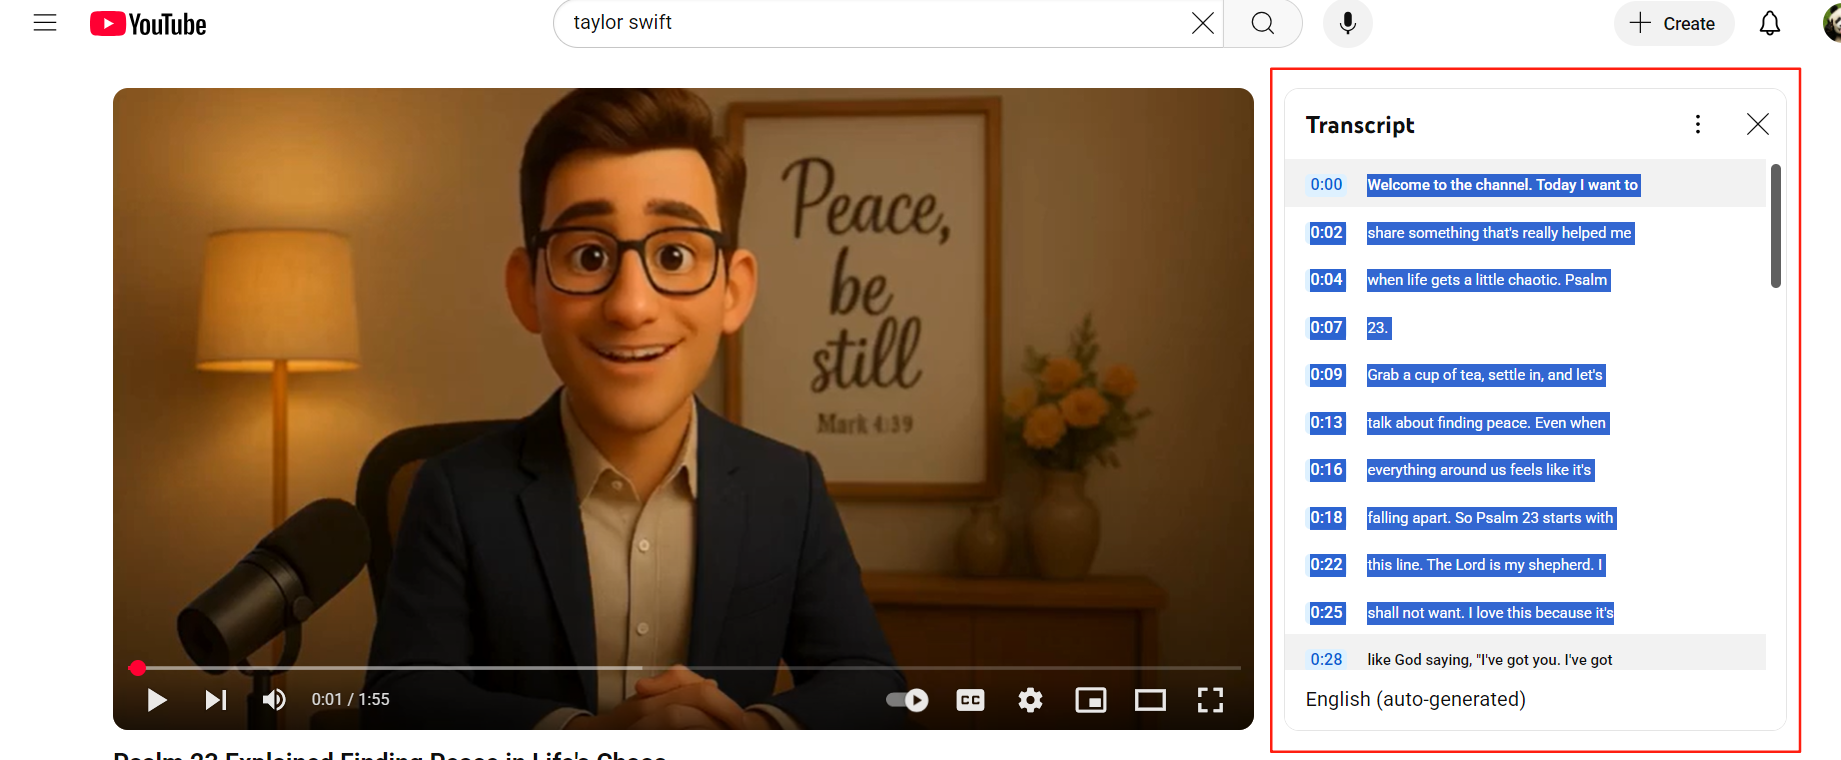
The biggest advantage of this method is how quick and convenient it is. You don’t need to upload any files or install anything, and it’s perfect for short videos or clear audio. That said, it only works when the video has subtitles enabled. If the uploader turned them off, you won’t see the “Show transcript” button at all. Also, the accuracy depends on YouTube’s auto-captioning—so if the audio has background noise or strong accents, you might see a few errors here and there.
If you want to get it from your phone youtube get inside transcript, you can watch this video.
Voice Input – From Video to Transcript the Old Way
Before AI tools became widely available, this was one of the few ways I managed to get transcripts from videos that had no subtitles. It’s kind of a “DIY” workaround using voice typing—and while it’s not perfect, it can work surprisingly well for short clips or when I just need to grab a few quotes quickly.
This method has saved me a few times—especially when the YouTube video doesn’t have subtitles and I don’t want to use any complex tools. It’s kind of a “DIY” hack using voice typing, and while it’s not perfect, it can work surprisingly well for short clips or when I just want to grab a few quotes.
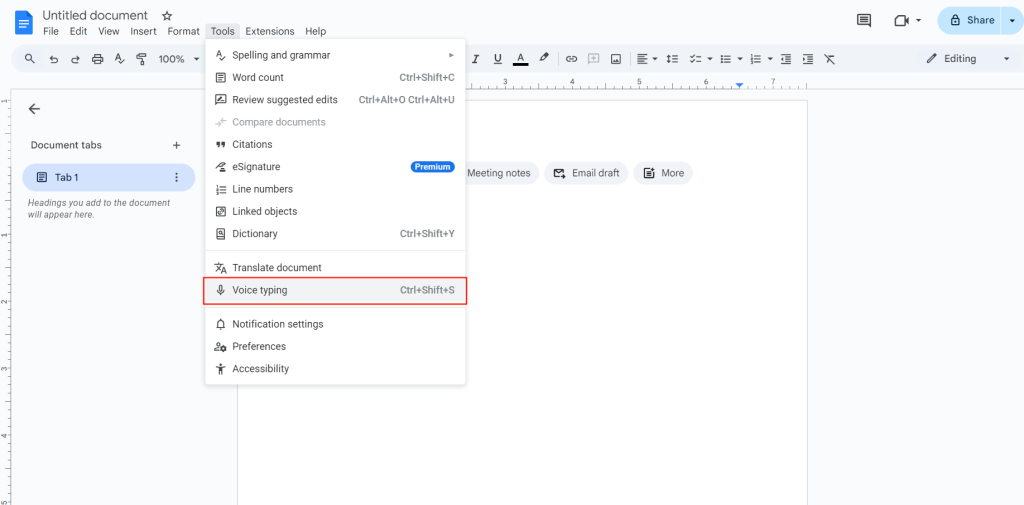
- First, open a blank Google Doc or any note-taking app that supports voice typing. I usually use Google Docs because it’s free and easy to access.
- Next, go to Tools > Voice typing in the top menu. You’ll see a little microphone icon appear on the left side of the document.
- Now, play the YouTube video out loud on another device—this part is important because your computer’s mic needs to “hear” the video clearly. Ideally, us a quiet room with no background noise.
- Click the microphone icon to start recording, and let the video audio play. Google Docs will automatically start transcribing what it hears in real time. Once you’re done, click the mic again to stop. Then just copy and paste the text where you need it.
This method is obviously a bit scrappy, but it works when you’re in a pinch. The good thing is that you don’t need any downloads or extensions, and it works even if the video has no subtitles at all. The downside? It’s not great for long videos—it takes time, and any background noise or unclear audio can mess up the transcription. But for quick use or short quotes, I’ve found it surprisingly handy.
GStory Subtitle Generator – Turn YouTube Video to Transcript with AI
After trying YouTube’s built-in transcripts and even the old-school voice input hack, I eventually switched to AI tools—and honestly, it’s a game changer. The one I rely on most now is GStory Subtitle Generator, because it works even when a YouTube video has no subtitles at all, and it produces a clean, accurate transcript in just a few clicks.
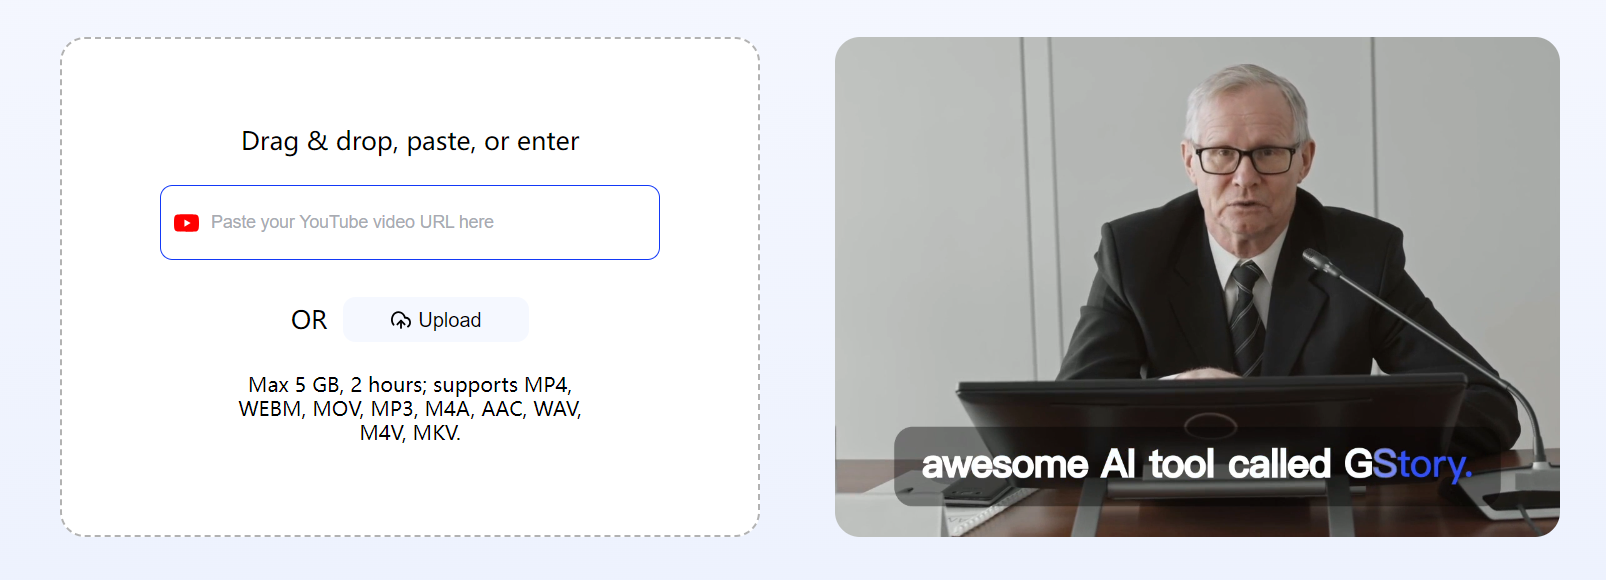
- First, upload your video. You can either drag and drop a file directly from your computer or simply paste the YouTube link into the box. GStory supports files up to 5 GB in size and 2 hours in length, and works with a wide range of formats including MP4, WEBM, MP3, etc.
- Next, select the language of the video. GStory offers dozens of language options, so whether your video is in English, Spanish, Japanese, or something else, you can pick the correct one before starting the process.
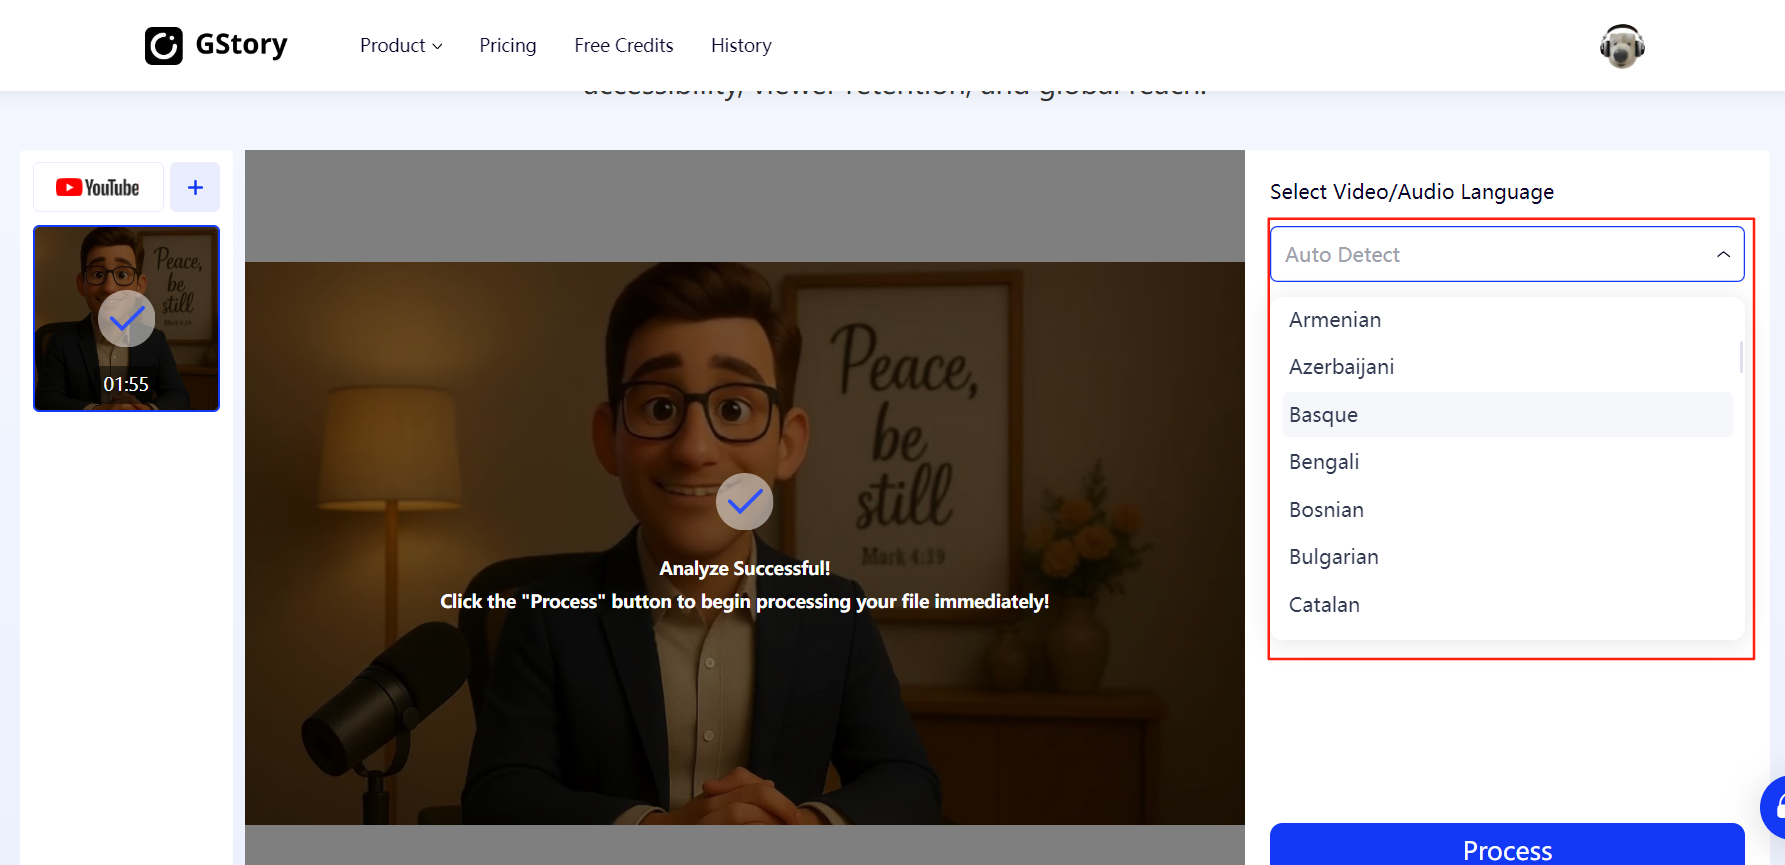
- Once you’ve set the language, click the Process button and let GStory do the work. The AI will process the audio, clean up background noise, and generate an accurate transcript for you. Depending on the length of the video, this usually takes just a few minutes.
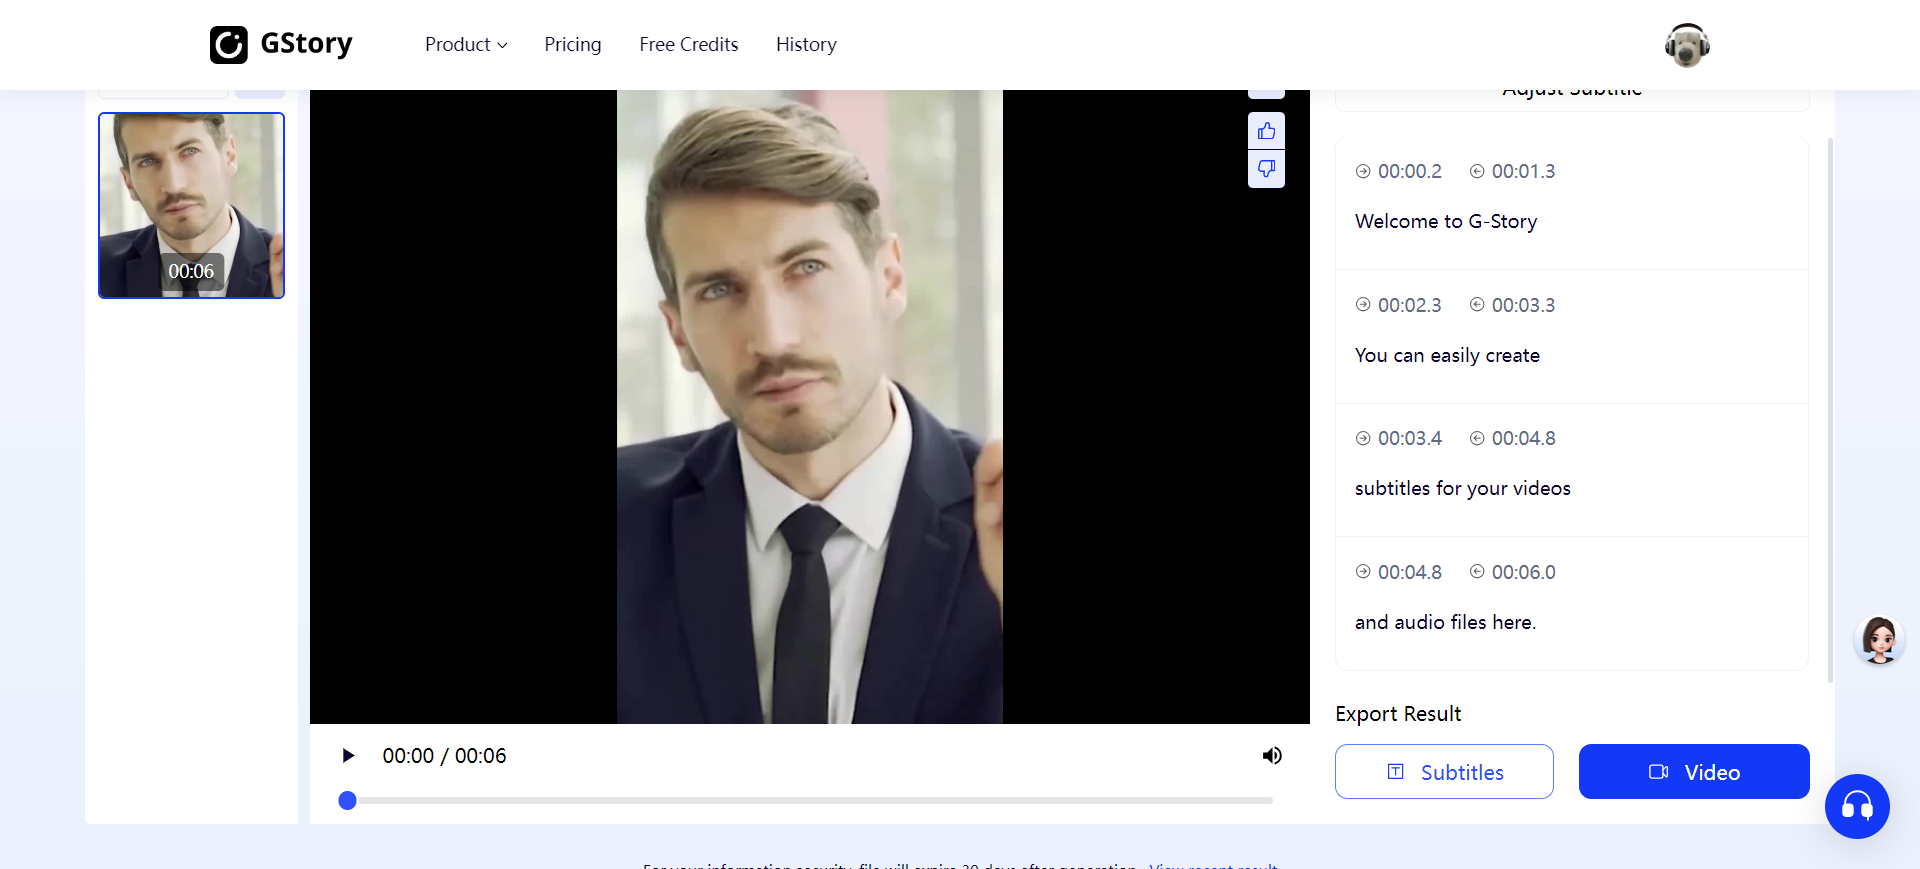
- Finally, export your results. You can choose to download the transcript as plain text (.txt) if you just want the words, or as a subtitle file (.srt or .vtt) if you plan to use it in video editing. And here’s the part I love most: GStory also lets you translate your transcript instantly into multiple languages, so you can create multilingual captions or blog-ready text without switching to another tool.
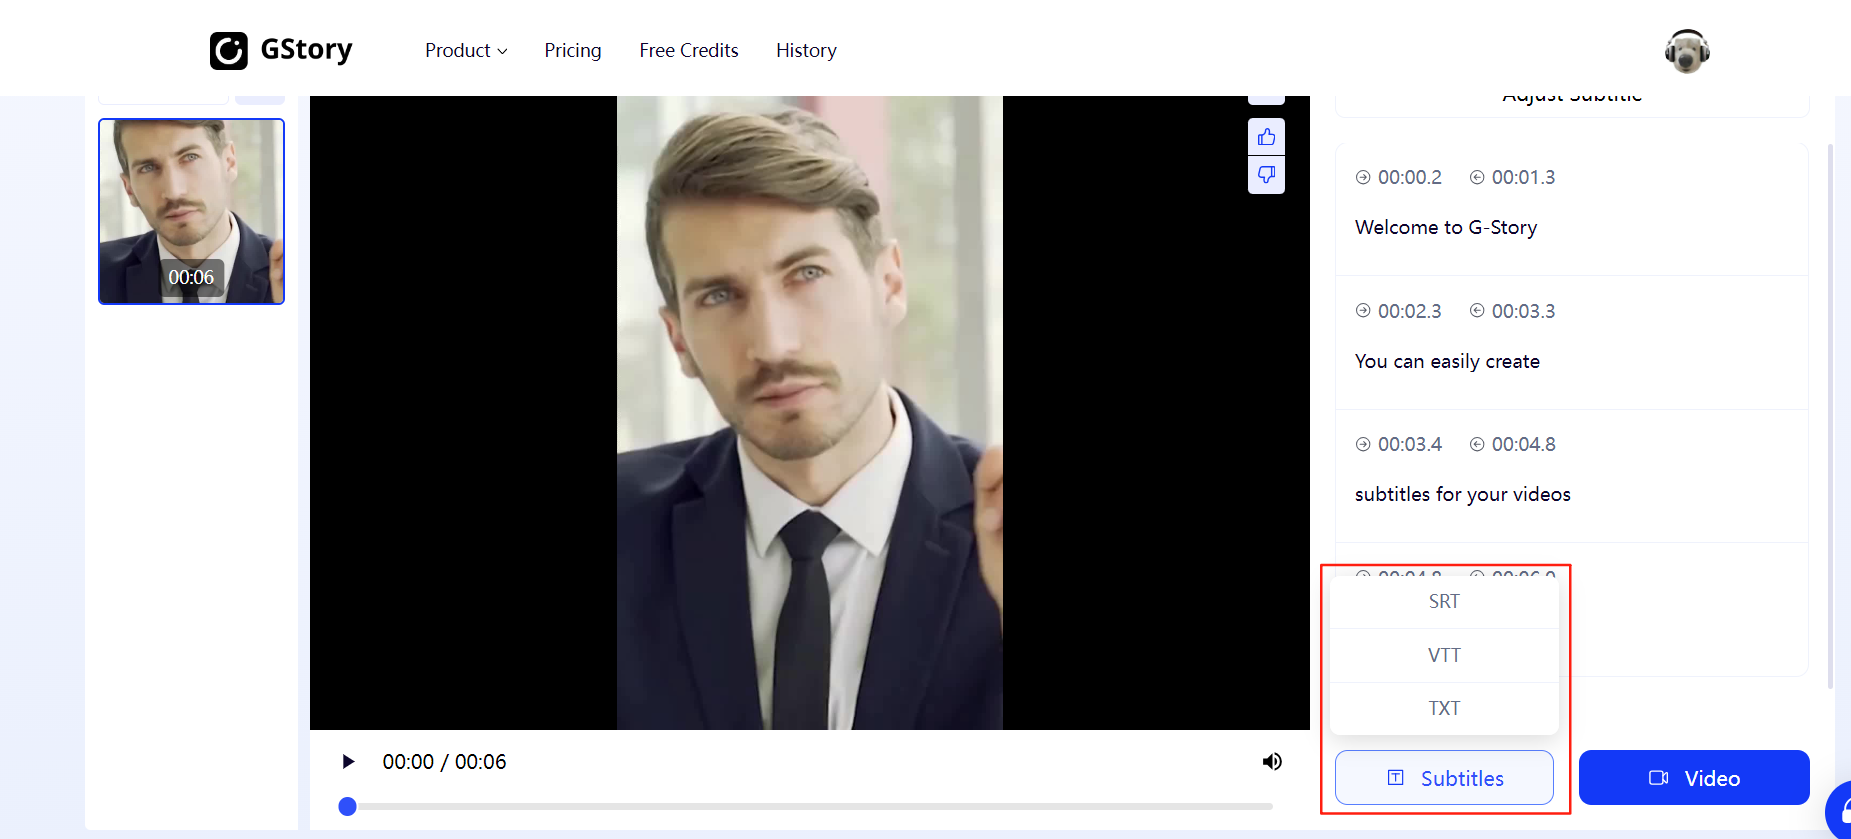
What makes this workflow stand out for me is how seamless it is—I can go from raw video to polished transcript (and even translated versions) in minutes, with timestamps included. Compared to the old manual methods, it’s faster, more accurate, and definitely more professional.
Conclusion: The Best Way to Convert YouTube Video to Transcript
I’ve tried almost every method out there—from using YouTube’s built-in transcript feature, to the old-school voice input trick, and now AI tools. Each one works in different situations. If the video already has subtitles, YouTube’s own option is quick and free. Before AI tools, I sometimes used voice typing as a workaround, but honestly, it’s only good for short clips. These days, I rely on GStory Subtitle Generator, because it gives me an accurate YouTube video transcript in minutes, works for long videos, and even translates the text into multiple languages.
So if you’re like me—watching long YouTube videos for research, content creation, or SEO—you don’t have to waste time pausing and typing anymore. Just upload the file or paste the link into GStory, let it handle the heavy lifting, and you’ll have a ready-to-use transcript in no time.
FAQs About YouTube Transcripts
Q1: How can I get a transcript of a YouTube video without downloading it?
You don’t need to download video from YouTube just to get the text. If the video has subtitles, you can use YouTube’s own “Show transcript” option. If not, you can use a YouTube transcript generator like GStory, which lets you paste the video link and instantly create a transcript online.
Q2: Can I use a YouTube converter to get text instead of video?
Yes—while traditional converters focus on downloading video or audio, tools like GStory act as a YouTube to transcript converter. Instead of giving you the raw file, it extracts the audio, transcribes it to text, and even offers translation.
Q3: What if the YouTube video doesn’t have subtitles?
No problem. Even if the creator didn’t upload captions, AI tools can still transcribe video to text by analyzing the audio directly. This way you can still get a full YouTube video transcript for studying, blogging, or content repurposing.
Q4: Is it possible to create a transcript from other online videos, not just YouTube?
Absolutely. While YouTube is the most common use case, many video transcript generator tools (including GStory) also support other platforms and local uploads. That means you can create a transcript from online video in general, whether it’s a lecture, webinar, or podcast recording.
Q5: Can I translate the transcript after generating it?
Yes. With tools like GStory, you don’t need a separate translator. After you generate a transcript from a YouTube video, you can instantly translate it into dozens of languages. This is especially helpful if you need to publish multilingual blogs or reach a global audience.
Q6: Are there other AI tools you recommend for YouTube transcripts?
Yes, there are quite a few AI options besides GStory. I’ve actually put together a detailed comparison of different video to text tools, including their pros, cons, and use cases. You can check it out in our blog.
